


10 ways to use a yoga wheel

10 ways to use a yoga wheel.
The guys over at Yoga Studio got in touch and asked if I wanted to try out any of their products. I’ve always been interested in a yoga wheel and have never bought one myself – so jumped at the chance to receive one from Yoga Studio to experiment with! (Thank you guys!)
Along with the yoga wheel, the Yoga Studio also sent me one of their purple yoga studio mats – which is smooth surfaced and really grippy!

I’ve really loved using my yoga wheel and decided to create a series of images showing you some different ways that you can use the yoga wheel to STRENGTHEN, LENGTHEN, RELEASE and maybe even CHALLENGE yourself!
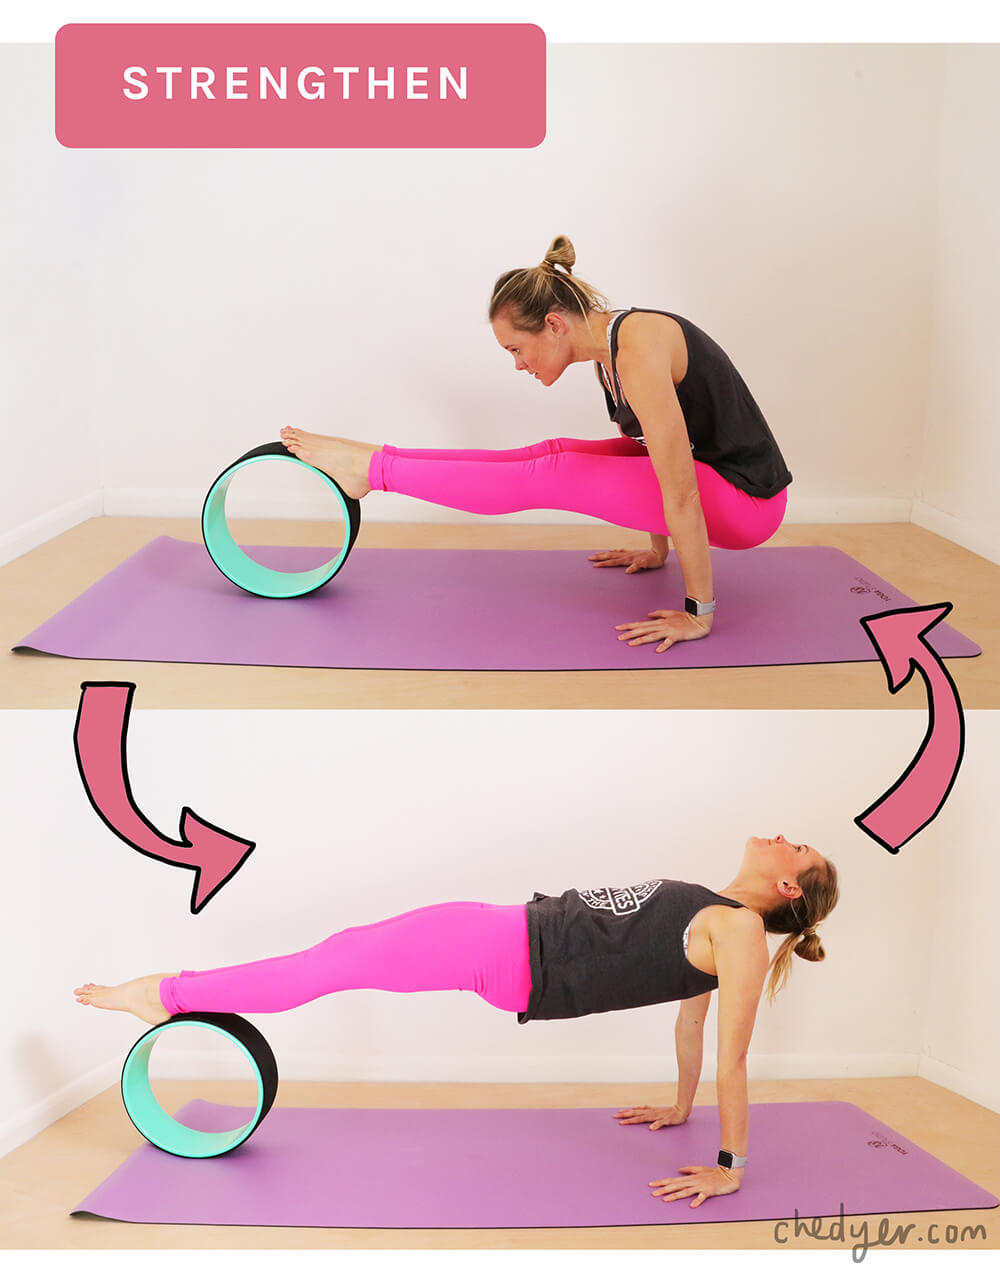
STRENGTHENING: Core + Hip Flexors, Arms.
These 2 positions work really well together to strengthen the arms and core of the body.
The top image is a great prep for L-sit practice and as you progress with this, you can aim to hover one foot off the wheel.
The bottom image is similar to Purvottanasana for those who are familiar with it from the Ashtanga series – which requires glute engagement to bring the hips towards extension.
Once you’ve practiced both individually, you can put them together – move as fluidly as you can between these two positions – aim for 10 rounds!

STRENGTHEN: Core, arms, focus!
This is a great sequence to prepare the body for handstanding! It can be quite challenging to get the tops of your feet onto the wheel, so just go slowly and with patience! Make sure the wheel is rolling directly towards you – otherwise it will make the whole movement way more challenging!
START in the top image – and if you feel this is challenge enough already – then it may be worth staying here and holding towards 10 breaths if you can. This is essentially a plank pose, but with the feet on a moveable surface the body and core has to work a bit harder to stabilise itself. Keep puffing up through the back of the chest and avoid the pelvis dipping down towards the ground. (If you do feel the pelvis dipping down and creating a shortening in the lower back – then bring the wheel under your thighs instead and build strength from that position.)
If you feel steady and in control in the top image then you can try rolling the wheel towards you with the feet – sending the hips up and over the shoulders. This does require load bearing through the wrists so make sure you have warmed up appropriately beforehand.
Roll from one position to the other as smoothly as you can – aim for 10 rounds!

STRENGTHEN: Legs, glutes
Glute Max (the main and largest muscle on the bum) is largely responsible for bringing the hip into extension – ie: moving the leg backwards. So when we want to work the glutes it’s useful to bring one hip into extension by moving the leg backwards. Single leg squats are great for targeting this!
Try the following above! (You may need to be near a wall to help yourself get into this initially!)
Stand on one leg, whilst extending the opposite leg backwards. Lightly drop the top of the foot onto your yoga wheel. It may be challenging enough to hold your balance in this position! If it is, then stay where you are and work to build stability in this position for 5 – 10 breaths.
As you progress, you can begin to lower the back knee down towards the mat – the knee does NOT need to come all the way down to the ground – and in fact, little is often better as the body begins to learn to stabilise around the hip joint.
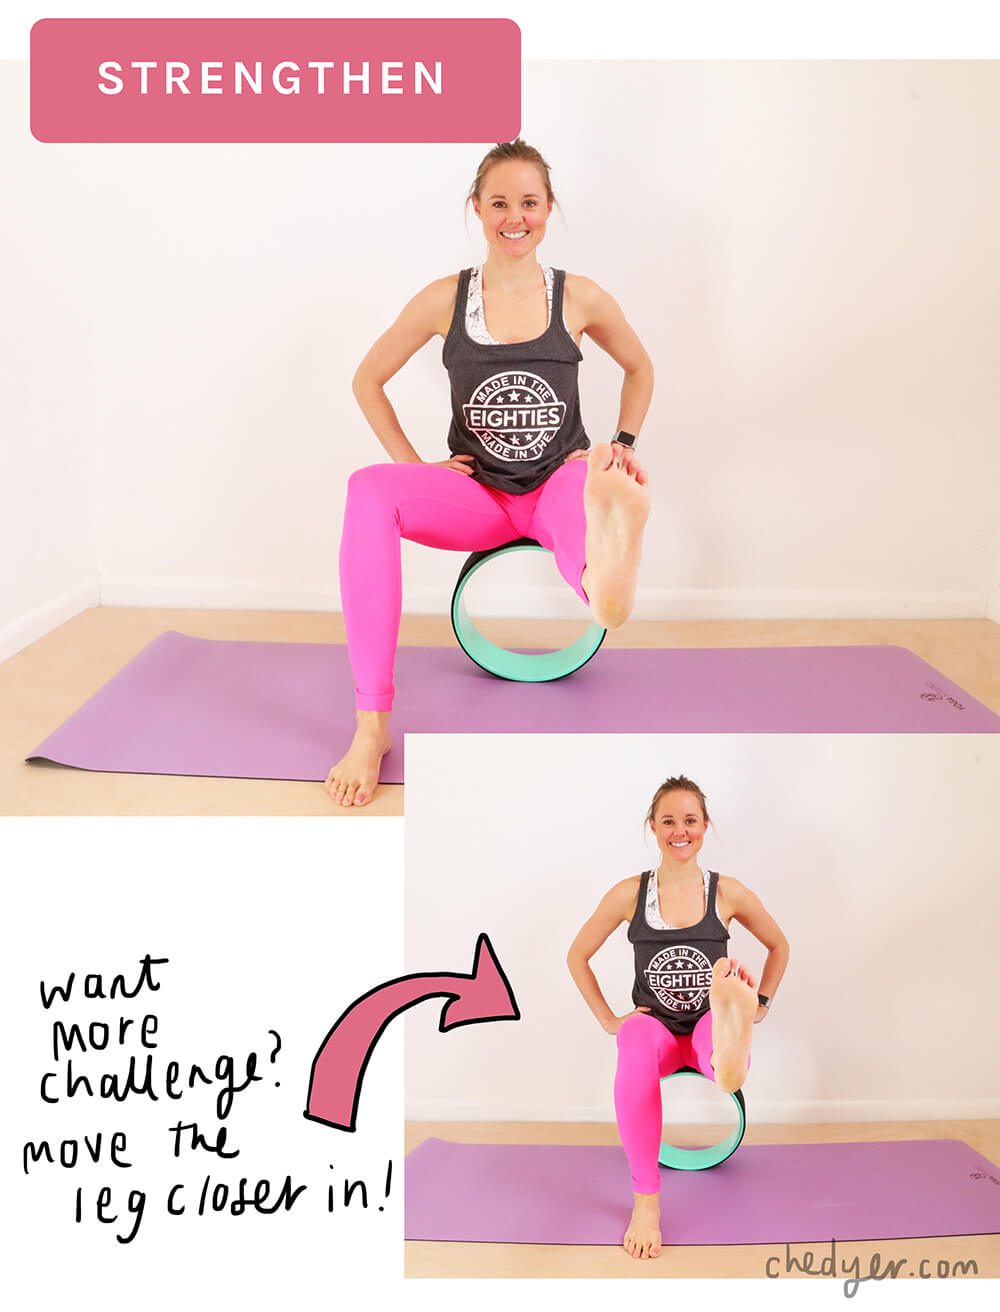
STRENGTHEN: Hip flexors + core
Because so many of us sit for extended periods of the day, the hip flexors are most often in a shortened position. It’s not the problem that they are in a shortened position – as muscles need to work at all range, but the issue comes more with the body being weak at this range as we don’t load the tissue when we are sitting on our chairs!
Try the above –
Sit on the very edge of your yoga wheel and start with the feet out wide on the ground as in the top picture, lift one leg up and hold it there. You will feel the front of the hip and outside of the hip start to fire! This may be challenging enough as it is, but if you want to challenge yourself further – walk the grounded leg more in line with the hip – as in the bottom picture.
If you want to challenge the body to find more stabilisation here – you can gently roll side to side on the wheel – which will also invite the core to the party as the body stabilises!

LENGTHEN: shoulders, thoracic spine, legs.
Puppy pose variation: Begin with the knees on the ground and gently roll the wheel forward and away from you. The chest does not need to come all the way to the ground! And in fact, it is better for the health of the shoulder joint and surrounding ligaments, to keep the head of the upper arm bone/humerus central in the shoulder joint cavity. In this way we can explore gently increasing shoulder range of movement and a little bit of thoracic spine extension.
Forward fold variation: This is a way to lengthen the back of the legs and posterior chain of the body. If the hamstrings are tighter and the hands don’t reach the wheel – don’t force it, rather bring your wheel up against a wall and press the heels of the feet into it instead. If the hands do reach the wheel, then also take a chance to check in with your active range of movement here too – so – if you let go of the wheel, is the body able to HOLD itself with strength, in the same position as it was in, or does it suddenly fling back? Wherever the body moves back to is a good indicator of your active range of movement. In order for joints to be healthy, as we increase range of movement, we need to build strength in those positions, so that the body can support itself at that range.
Thoracic Spine Extension: I really believe that this is most specifically what the yoga wheel has been designed for – and it clearly shows! This pose, for me, completely fits the yoga wheel and provides a great opportunity for thoracic spine extension – which is great if you are someone, like most people, who sit hunched over a desk, phone, computer most of the day!

RELEASING: IT Band
The Iliotibial Band (IT Band) is a thick band of fascia that runs from the outside of the knee to the outside of the hip. One of it’s main jobs is to help stabilise the knee during running – so, if you’ve been doing a bit of running lately – like moi, you may notice that this band of fascia is very tight. (For me I experience this as pain in my knee as the tightness of the IT fascial band starts to pull my knee over and out of the Patella groove it’s meant to run in).
We aren’t easily able to “stretch” fascia in the same way that we stretch muscle – but because of it’s thixotropic nature (meaning: basically over time it becomes more fluid like and malleable) we are able to RELEASE tightness in certain spots.
Lay sideways on your yoga wheel with the outside of your leg (ie: where the IT band runs) along the top of your wheel. Already this may feel super uncomfortable if the IT band is tight! Give it time if you can for that malleable nature of the fascia to start kicking in. Slowly roll the wheel up and down the side of the leg – trying your best not to grimace. Repeat on both sides.

CHALLENGING: Scorpion Pose prep
Just for fun, if your practice and body is ready for it – you can also explore scorpion pose prep with the Yoga Wheel. Once you’ve warmed up sufficiently (shoulders, core, thoracic spine extension – as we’ve already looked at!) bring the forearms down to the mat, hold onto the outside of the wheel and slowly lift up into pincha mayurasana. From here – aim to slowly lower with control, one foot down towards the yoga wheel – maybe the foot touches the wheel or maybe it doesn’t. If the foot does touch the wheel – you can also use it as an opportunity to practice a kick back over to bring the feet back down to the mat.
It’s been such fun sharing these ways to use a yoga wheel with you! Thank you again to Yoga Studio for gifting me one!

If you want to follow along with a free 20 min yoga wheel flow video targeting core, glutes and arms then drop your name and email into the form below to be sent the exclusive link to the flow!
Child s pose is a classic, restful pose that helps stretch the hips, thighs, and low back in a gentle, accessible way. When you use a yoga wheel during the pose, reaching your arms forward on top of the wheel s raised surface, you also experience a nice stretch through the shoulders and chest.
Yes using a wheel under the arms in childs pose is a great way to open up the thoracic spine! Thanks for sharing! xx